Pages

Ladies, if you haven't heard about environmental friendly reusable menstrual products, please read posts on Cloth pads & cups...

Monday, October 1, 2012

Bag Project 19 - Sewing Notions Box

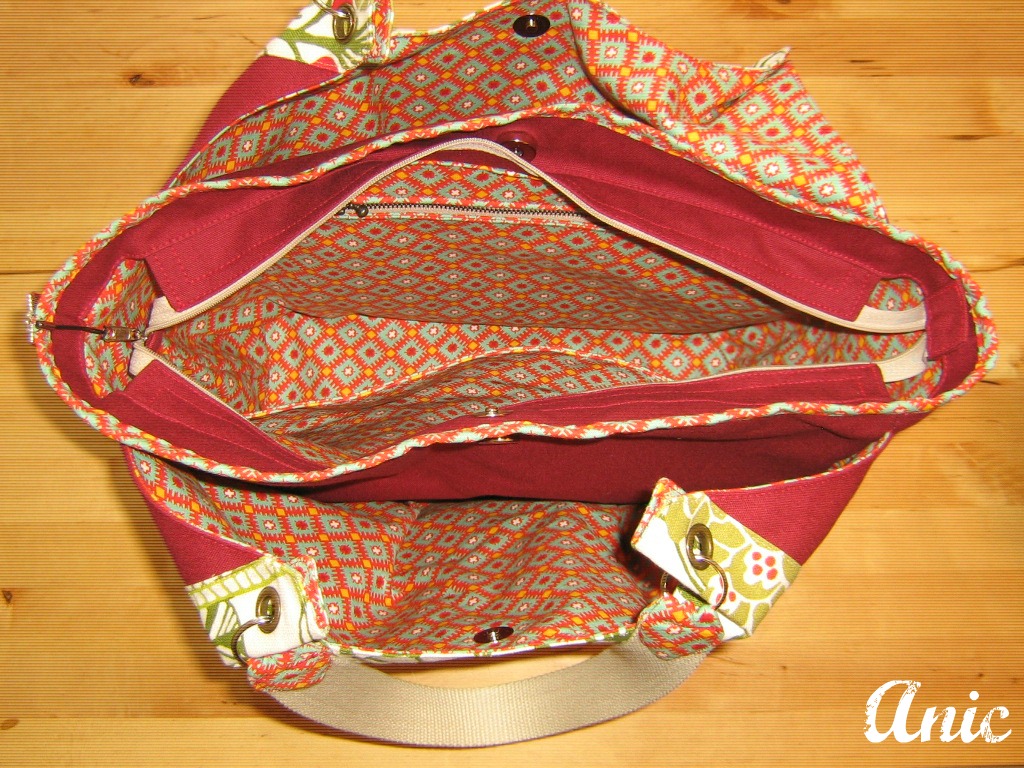
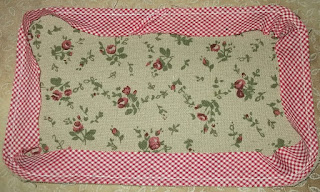
My 10th project with Alice Peng's sew along...   Another one with cord piping.    Wanted the box to stand well, I used very hard stabiliser...   so difficult to sew at the corner.   Not so much about the ability of the sewing machine sewing thick material, but more of ensuring edges of all layers line up exactly...


A few photos which hopefully explain the technique I was taught on how to do cord piping which cover a full square/rectangular/circle:


 First, find out the length of bias tape

 Remove the clip and sew the 2 ends together...   See step 5 here : http://www.sewlover.com/basic/binding/01.html


Now, we have the right length of bias tape with 2 ends sewn.


  Baste it..  and then put the cord in the middle and fold the bias tape into half..


Baste it again but make sure you leave a few centimeters not basted at the 2 ends of the cord

Hand sew the 2 ends of the cord together....

Baste the 2 ends....

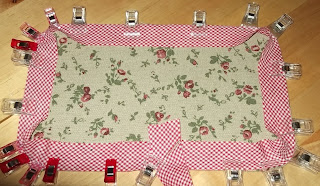
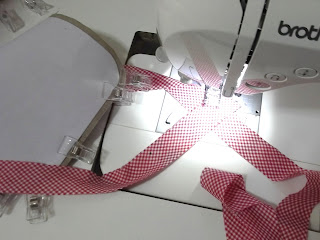
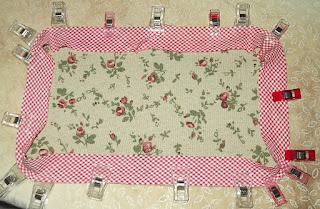
I hope the above pictures are useful to you....  

When sewing the pieces together, it is very important that edges of all pieces line up correctly.

Useful reference links for adding piping to bag:
1) http://www.sew-it-love-it.com/sewing-cording.html
2) http://tw.myblog.yahoo.com/jw!xIaEdO2eGRxklvw1H5zeF_4S/article?mid=57805  - this one shows how to join the 2 ends without overlapping..   I don't have the fanciful double sided tape,  I just use pin or clips... 
3) http://punkinpattern.blogspot.com/2011/07/how-to-sew-in-piping.html


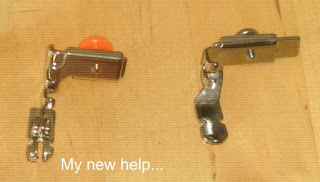
Update:  Mila, I use adjustable zipper foot, either one of below.   You could also use the normal zipper foot.


Bye,
Anic

Green Idea 3 - Making your own deodorant... 3

I have been using homemade deodorant: http://anic-lohas.blogspot.com/2012/01/green-idea-3-making-your-own-deodorant2.html

With the same recipe, today I made another batch...   The last batch I made has lasted me 18 months including sharing some with a friend and I just stored it in a small jam glass jar I recycled.   This time, I poured the mixture into 20 gram lip balm tubes, easier to use..  :)  


The link to the recipe in case you want to try:  :)

Regards,
Anic


Sunday, August 12, 2012

Bag Projects 16, 17 & 18 - all with piping

These are my May, June, July 2012 Alice Peng sew along projects.

I made this bag from thick canvas from Taiwan bought from Emma Huang.  Very sturdy..  but mati mati jahit with my NV 50.


Pencil case

Overnight bag

This bag is made from thick canvas bought online from China.  Very thick but the grain is not as fine as the thick canvas from Emma.   Again, another jahit sampai berpeluh peluh project...


Useful reference links for adding piping to bag:
1) http://www.sew-it-love-it.com/sewing-cording.html
2) http://tw.myblog.yahoo.com/jw!xIaEdO2eGRxklvw1H5zeF_4S/article?mid=57805  - this one shows how to join the 2 ends without overlapping..   I don't have the fanciful double sided tape,  I just use pin or clips...
3) http://punkinpattern.blogspot.com/2011/07/how-to-sew-in-piping.html

Bye,
Anic


Friday, August 10, 2012

Plant it yourself - Basil

My favourite herbs at the moment,  Sweet Basil and Thai Basil.

There is no supermarket near my place which carry Sweet Basil. I have been wanting to plant it myself..   One day I bought a pot with only 1 sweet basil plant and cost me RM9 at Kelana Jaya Pasar Tani.   With just 1 small plant, it couldn't supply what I need.  My friend found a nursery which sell a pot with many sweet basil plants at RM11.30 per pot.  I was overjoyed when I saw the plants at Floristika, Jalan Liku, Bangsar.   I bought a pot of Sweet Basil and a pot of Thai Basil.   They came in small plastic pots but I changed them to bigger pots in hope that they will grow a lot bigger and give me plenty of leaves..  :)

Sweet Basil

Thai Basil
There is still fear that I will eat up all the Sweet Basil leaves and kill the plant.   So,  I want to have more Sweet Basil plants.   I tried to grow it from a cutting of the plant after some research on internet.

I kept the cutting in a mug and left it in my balcony but hiding it away from direct Sun.   I changed water everyday.


I was so happy to see the root system developed over a few days.   


Finally they are in the pot....

It gives me great satisfaction using herbs from of my own balcony..  :)

Check these links out for tips to grow your own Sweet Basil.
    http://www.ehow.com/way_5931509_can-basil-roots-plant-them_.html
    http://tipnut.com/grow-basil//

Wish you a wonderful weekend,  bye,
Anic

Sunday, June 17, 2012

DIY Cloth Pad 12

I sewed more cloth pads.  I have a collection of Flannel prints and it is time to turn them into some good use...


They are panty liners good for spotting and light flow.   They are topped with flannel and bamboo fleece as absorbent layer.    I used 2 layers of bamboo fleece but 1 is smaller so that the pad is thinner.
I still have a few to sew...    Haven't figured out what to do with them yet..  I already have enough cloth pads...


For those who would like to sew your own cloth pads, check out this link:
http://clothpads.wikidot.com/patterns 

and where to get the material locally:
http://anic-lohas.blogspot.sg/2010/07/diy-cloth-pad-6-where-do-you-get.html 

and all my post about this subject:
http://anic-lohas.blogspot.com/search/label/Reusable%20Menstrual%20Products


Enjoy the remaining Sunday...
Anic


Saturday, June 2, 2012

DIY Cloth Pad - 11

So long..  I haven't sewn Cloth Pad..

Finally, I got around to sew these 2 cloth pads for a friend to clear my long outstanding cloth pad debt.


These panty liners are topped with flannel and with bamboo fleece as absorbent layer.   My friend wanted them as  menstrual cup backups.

For those who would like to sew your own cloth pads, check out this link:
http://clothpads.wikidot.com/patterns


and where to get the material locally:
http://anic-lohas.blogspot.sg/2010/07/diy-cloth-pad-6-where-do-you-get.html

and all my post about this subject:
http://anic-lohas.blogspot.com/search/label/Reusable%20Menstrual%20Products


Have a nice weekend...
Anic

Tuesday, May 29, 2012

Bag Project 15 - Bag with appliqued flowers

This is my April 2012 Alice Peng sew along..  


This is the first time I sewed a piping to a bag.   It was actually not as difficult as it looked.

A nice tutorial on sewing piping to a bag:


And I just realised I could  remove the flatbed attachment  of my NV50  to ease sewing of bag with small opening (or any cylindrical piece :))...  

Flatbed attachment

Flatbed attachment removed to ease sewing of cylindrical piece

Bye now and have a good week,
Anic


Monday, May 7, 2012

Frame Purse

I made these frame purses with tutorial provided by Jess See  in the virtual classroom organised by Potato House.

The tutorial I followed is only provided to participants, however, please refer to my previous post on Frame Purse.  There are online tutorials shared there..


This and below are 2 sides of the same purse..   The center pieces are from scrap bag I bought..  Can you guess where I got these cute pieces from?


Bye now,
Anic


Wednesday, April 25, 2012

Bag Project 14 - Bag Organiser

This is my March 2012 Alice Peng sew along homework..    A bag organiser..   This time I used heavy cotton for external.   I bought these fabrics when I first started sewing back in 2010 from http://fabricbuffet.blogspot.com/.  Finally got around to use them..  :)


If you would like to make one..   here are some useful online tutorial links to refer to:
1)   http://tipnut.com/purse-organizer-sewing-tutorial/  - links to a few tutorials


2)  http://www.craftpassion.com/2011/11/purse-organizer-insert-with-adjustable-divider.html?pid=704#picgallery

3) http://www.marthastewart.com/272638/removable-tote-organizer  -  this one is for a Tote

Bye now,
Anic

Saturday, April 7, 2012

Shinnie Sew Along - Project 1 (Applique Long Wallet)

I joined a sew-along organised by Shinnie focus on applique.   She has published a lot of her work in craft magazines and also her own books.    There will be six assignments in this sew along (all with Shinnie unique applique design)  and more than a thousand crafters have joined this sew along.

The first assignment is a wallet, see the below cute design by Shinnie.


Here is my version.   Plenty room for improvement.


Great difficulty in attaching the zipper.   Have to find a better way of doing this.   

For applique & stitches how-to, please refer to my kitty applique coin purse project.

Please meet my new friend, needle threader....

I have to invest in this as the most fearful thing for me while I do applique is having to thread the applique needle..     The hole in the applique needle is really really small.

Other than the above, my other friends in applique work:


I have reported this before in my other post.


Have a great weekend,
Anic


Saturday, March 24, 2012

Sewing Notion 19 - Magnetic Seam Guide


When I sewed a water proof bag sometime ago, I couldn't draw a line easily on the material.   To make sure I sewed an equal allowance straight line, I used the magnetic seam guide (see the gadget circled in red).


A bigger image of it borrowed online

Just attach  the magnetic guide to the metal throat plate on the sewing machine and it will help maintain a uniform seam width while you sew.   It is very convenient but the machine must have surface with steel for it to stick to..   In my NV50, there is barely enough surface for it..   

If you like to know how this is done in action, here is a nice video:

A fb friend suggested DIY using magnetic for Whiteboard...  something to try out. 

I have also seen crafters use  post it note to help:
From http://nicolemdesign.blogspot.com/

An interesting image with all kinds of seam allowance guide:
From http://sewing.about.com
That is all about seam guide.

Before I say bye, here is my naked NV50 while it was being serviced last week.   

It was nerve wracking experience watching my machine being serviced..   I fear that it will actually become worse after the service.   I still haven't do a test run at home...  hoping that it will at least sew like before.

Have a good weekend,
Anic


Saturday, March 17, 2012

Bag Project 13 - 3 Layer Bag

This is my Feb 2012 Alice Peng sew along homework..   Have never sewn such thick material with so many layers with my Brother NV50. At time, at very thick area, I have to help the machine by pulling the material so that it actually moved...  The maroon fabric is like Canvas (but thicker).   Not just thick canvas, but many layers, for example, sewing the body (with pocket) to the gusset (again with pocket), 12 layers of fabric + stabiliser.  I have to say, I am very pleased that N50 was up for it... though not easy but manageable. 


I like the way the handles were decorated.  Basically adding a strip of fabric to the webbing.   


2 front pockets, 2 side pockets, 2 pockets inside.


BTW, thinking to send my NV50 to LSN for service. The calendar they sent me has a coupon for home sewing machine service at RM9 for this month!   If you have the calendar, you may want to check out what promotions are available throughout the year.


Bye now and have a good weekend,
Anic

Thursday, March 8, 2012

Bag Project 12 - Waterproof Fabric Doctor Frame Bag

I sewed this with the tutorial provided by Florence Lui  (http://myhandmadepatchwork.blogspot.com/) in the virtual classroom organised by Potato House.

The tutorial I followed is only provided to participants, however, a similar  tutorial is available on the internet: http://tw.myblog.yahoo.com/fannysun1209/article?mid=19679&prev=19831&next=19525


These are the frames I bought from Florence.    Look simple but they are great...


I like the bag opens up wide and stands well (due to the waterproof fabric). 


I thought I need to use Teflon foot but I managed to sew it with normal foot...   


To sew this waterproof fabric, we have to be careful not to make mistake as unpick will leave holes, jangan main main.. :)

There are differences between oil cloth & laminated fabric...  I don't know which one is the one I am using...  See Sue's explanation here:
http://mybotang.blogspot.com/2011/05/oil-cloth-vs-laminated-cotton.html

Tips about sewing oilcloth (laminated fabric same same) here:
http://sewmamasew.com/blog2/2007/01/oilcloth-tips/

In my view key points are:
1) Don't make mistake :)  Unpick will leave holes.

2) The foot must be able to glide on the material, you can achieve this with Teflon foot, but there are also other methods mentioned in the sewmamasew article.  For the waterproof material I used,  I didn't find problem though using the normal foot.

3) Use 16 or even bigger needles (check that after you sew, the stitch is not loose like below.  If it is loose, then use needle size 18.)


Bye now,
Anic

Link Within

Related Posts with Thumbnails